
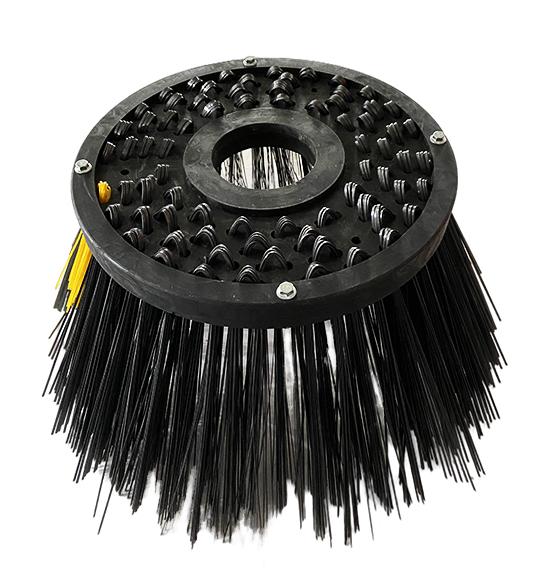
Most wrong brush orders are wrong for one reason: the measurement. A side brush has four dimensions that matter, and two of them are routinely confused. This is the procedure to follow with nothing more than a tape measure, a ruler and a phone camera.
Before You Start
You need: the worn brush removed from the machine, a tape measure, a steel ruler, a marker, and a well-lit spot. Photograph the brush before you measure so the photos and numbers match.
Step 1: Outer Diameter (OD)
Lay the brush flat. Measure across the full bristle face through the centre — tip to tip — at two points 90° apart. Record both numbers.
- If they differ by more than 20 mm, the brush is worn unevenly. Quote the larger figure; the replacement must reach the corners.
- Do not measure the steel ring or disc; the OD that matters is the bristle tip circle.
Step 2: Core Bore
Measure the centre hole where the brush mounts on the hub or shaft. Use the steel ruler across the bore, not the tape, for accuracy. Typical bores run 25–60 mm.
The most common error: measuring the bore of the hub instead of the bore of the brush. Measure the brush itself.
Step 3: Bolt Pattern (The One Everyone Gets Wrong)
This is where orders fail. Two brushes can have the same OD and bore but different mounting holes.
Do this:
- Photograph the mounting face straight on, with the ruler lying across the face for scale.
- Count the bolt holes.
- Measure the centre-to-centre distance between adjacent holes — not the distance from the centre to a hole.
- Note whether holes are slotted or round, and the hole diameter.
Send that photo. A manufacturer can read the pattern from it faster than from a description.
Step 4: Profile — Flat, Waisted or Cup
Look at the brush from the side:
- Flat — bristles trimmed level, constant thickness.
- Waisted — thicker at the centre, tapering to the edge; more aggressive at the rim.
- Cup — bristles angled to form a shallow bowl; used for concentrated gutter work.
Say which one you have. Waisted and flat brushes are different moulds, and a flat brush substituted for a waisted one will sweep unevenly.
Step 5: Filament and Trim Height
Note the filament colour (usually indicates material), the filament diameter if you can measure it, and the trim height from the ring face to the bristle tip.
How to Measure Waisted and Cup Brushes
Flat brushes are straightforward. Waisted and cup profiles need two extra figures, because a single diameter does not describe them.
Waisted brushes taper from a thicker centre to a thinner rim. Record:
- The core thickness — bristle depth at the hub
- The rim thickness — bristle depth at the outer edge
- The waist point — where the taper starts, expressed as a diameter
A supplier reproducing a waisted brush needs the taper, not just the OD. Substituting a flat brush of the same OD gives visibly uneven sweeping, because the rim that reaches the gutter is now the wrong depth.
Cup brushes have bristles set at an angle forming a shallow bowl. Record the cup depth — the distance from the rim plane to the lowest point of the bristle face — and the angle if you can estimate it. Cup brushes are typically used for concentrated gutter work where the bowl shape concentrates contact.
Reading a Brush That Has Lost Its Shape
A worn brush does not measure like it did when new. Handle this deliberately:
- Trim height: measure from the ring face to the longest remaining tip. Do not use the average — a worn brush with a few long tufts gives a falsely generous average.
- OD: worn brushes measure under size. If the original OD is unknown, compare against the machine’s geometry: the brush should over-reach the kerb line slightly, not just touch it.
- Distorted hub: if the mounting face is bent or the bore is oval, note it. Replacing a brush on a damaged hub wears the new one out faster, and the hub may need replacing too.
Where a brush is badly worn or broken, measure the machine instead: the distance from the hub centre to the desired sweeping edge gives the required OD directly.
Photographing for a Quote
Photos do more work than numbers in most quotations. Four shots cover everything:
- Top face with the ruler lying across the diameter — for OD and profile.
- Mounting face, straight on, ruler in frame — for the bolt pattern.
- Side profile at the hub — shows flat, waisted or cup instantly.
- A close-up of the bristle — shows material, diameter and whether tips are glazed or broken.
Put a ruler or a coin in every shot for scale. A photo without a scale reference forces a follow-up question, and every follow-up question delays the order.
What to Send for a Quote
Five items, in one message:
- Machine make, model, year
- Two OD measurements + bore
- Photo of the mounting face with ruler in frame
- Profile type (flat / waisted / cup)
- Quantity needed and delivery country
With those, a manufacturer can confirm fitment and quote within 12 hours. Without item 3, expect a round of questions — that photo is what removes the risk.
Spec and quote: Sweeper Side Brush · Full sweeper brush range
